When installing the latest version of the ITS Docking Firmware with ITS Updater, an "Update Error - Docking unreachable" message appears. What's the problem ?
To update your Docking, remember to set it to "update" mode by holding down the update button in the sim card compartment when starting up the device.
More information in the manual.
Is it possible to connect 2 Chronoprinters to a HL540-GSM Docking Station ?
Yes, it is possible to synchronize a 2nd Chronoprinter with the first in GPS on the HL540-GSM Docking :
The Docking connected to the 1st Chronoprinter emits a synchronization pulse every minute (black and green banana output from the Docking). You must then prepare the synchronization of the 2nd Chronoprinter with one more minute, connect the synchronization output of the Docking of the 1st Chronoprinter with an input of the 2nd Chronoprinter (input 1 for example) and do not forget to unblock this input. The 2nd Chronoprinter will then start its time base with this synchronization pulse.
Note : the 2nd Chronoprinter, once synchronized, will operate on its own time base, which can vary according to its own quartz with a maximum tolerance of 0.08 sec / 24h. There is no resynchronization every minute.
It is also possible to synchronize 2 Chronoprinter with each one Docking thanks to a specific RJ11 cable connecting the 2 Dockings by using the “Synchro Slave” function on the 2nd Chronoprinter which will then synchronize on the time base of the 1st.
While using my Chronoprinter CP540 / CP545, I encounter an error message : FWT Timeout 1. What does this mean and how to resolve it ?
The error message FWT Timeout 1 means communication trouble between main board and timing board.
To resolve this problem:
- If simple communication trouble with no hardware influence, load T firmware only:
- Make a Hardware reset
- Remove the battery
- Press 2 or 3 times on “RESET” inside the battery compartment,
- Hold down “ON” and “RESET” button for 1 min,
- Replace battery
- Update one element:
- Open the .dat file with your notepad and you’ll get the file as below:
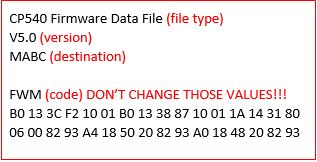
Destination MABC ou TKDM :
M (ou M): Main Board
A (ou T): Timing Board
B (ou K): Keyboard
C (ou D): Docking
In this file, all components will be updated. - Delete MBC and let only A (or KDM and let only T),
- Save the file before closing,
- Open Firmware manager, select COM port and upload the file you just modified (only the timing board with the boot loader will be updated). If the download does not start : play with the reset and Power ON button and Stop / restart until the Firmware manager gets connected to the device,
- Open again the .dat and put again MBC (or KDM),
- Save the file,
- Make a new and complete update.
- Open the .dat file with your notepad and you’ll get the file as below:
- Make a Hardware reset
- If the problem persists, then it is a hardware problem that requires replacement of the timing board.
My Cobra decoder is properly powered. When I test it by passing a transponder over the BNC plug, the transponder is not detected by the decoder. What should I do ?
What does the ACK button in the ITS Decoder Server software stand for ?
Timing software does this automatically ; if no ACK is received, the decoder stores the passages (several thousand) until it receives an ACK from the PC.
Should I check the "Auto" boxes in the ITS Decoder Server software ?
To activate the link between the active loop and the ATOM decoder, do I need to press the "Activate Loop" command in the ITS Decoder Server software ?